|
Hi DIY´ers! Here we go now with the inductors. Making your own inductors really is no pain! There is no hardcore math or expensive gear involveld - o.k,. a multimeter for measuring inductance would be nice to have, .... you can get them very cheap these days (cheaper than a pultec inductor from SOWTER). If you plan to build a mono pultec you may go without it, there are other ways to find out the inductance of a coil....but if you need 2 matching coils for a stereo version, then you should get one....I´ll explain later why. |
||
| This is the MM I use. It can measure inductors, caps and has a build in frequency counter. Price: 56 Euro (around $50) | 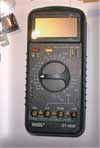 |
|
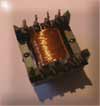
| 1st thing you´ll do when making an inductor is go out shopping bobbin and core. The core I use for my pultec clones is 20 x 25 mm in dimensions consists of manifer 196 ferrite. Take this as a starting point when you go and buy one. I tried other (smaller and different type of ferrite) cores, but I found out they doesn´t sound that good (very sharp and thin). ...and I never got my hands on an original Pultec, so I don´t know how close my inductor´s sound is to the original...all I know is: it sounds sooooooooo sweet :-) | ||
 |
 |
|
|
Download a datasheet for this core here
(sorry, german only)
|
||
|
You got your core and bobbin,, now it´s time for some math. What you need to know is the AL value of the core you got. AL is needed to calculate the turns of wire for a certain inductance. The formula is:
L = inductance, N = turns of wire
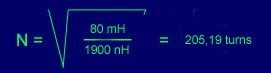
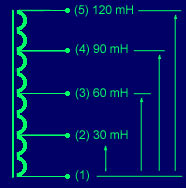
Let´s say we want an 80 mH inductor. If we look at the datasheet of my core we find an AL value of 1900 nH . So we need around 205 turn of wire to get an inductor of 80 mH from a core with an AL value of 1900 nH. If you are going to make an inductor for the pultec you may need some taps. Here´s an example for an inductor of 120 mH with taps at 90 mH, 60 mH and 30 mH. Using the formula above we get the following numbers of turns: |
||
|
|
120 mH ........ 251 turns 90 mH ........ 217 turns 60 mH ........ 178 turns 30 mH ........ 126 turns |
|
|
1st we wind 126 turns, make the 30 mH tap. then we wind 52 more turns (178 - 126 = 52) until we reach the 60 mH tap and so on ... then solder the wires to the pins
btw. do not expect the inductance between pin (4) and (5) to be 30 mH !!!! This is bacause the relationship between turns and inductance is NOT linear.
|
||
|
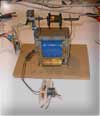
I build myself a very simple "winding machine" made of strong copper wire mounted on an old transformer. It looks funny but it does a good job.... :-) |
||
 |
 |
|
| I used 0,3 mm copperwire for the pultec coil. That way i got a DC resistance under 2 Ohms!!!! for the inductor. Remember, the less the DC resitance, the higher the Q of the coil! | ||
|
When winding and solder the taps is finished it is time for glueing both parts of the core together.The "glue" is a normal "2 component glue". It´s a good idea to have the multimeter connected to the coil while "glueing", contineously measuring the actual inductance.By pressing both parts of the core softly together you are getting closer and closer to the desired inductance. ...that´s all ! I guess the most difficult part is to find THE "good sounding" core. Fortunately the cores are mostly under $ 2 each, so there is "space" enough for experimenting ;-)
You can order the cores and bobbins here: the partnumber is 516619 - 92
(DROSSELSPULENBAUSATZ EF 25.1 ) contact them: international.sales@conrad.de
Hope this all makes any sense.... Feel free to contact me if there are futher questions. You find my email in the Group DIY newsletter: (S.Muexxxx@macxxxx.de, this is to prevent spam)
|
||

updated 01/07/02
![]()